 " id="k8-modal-content" alt="modal">
Activity log
Goal

Develope an activity log for different activities for future customers.
The basic customer table with employees already exist.
You should create the following elements:
- master data form for activities
- HTML-catalog for a chronological activity log
With k8 Web Kit it is easy to generate the basic elements. Creating form interactions to other tables can be configured with the documentation and examples.
Support is available by discord: K8 Web Kit
2nd element: Activity log
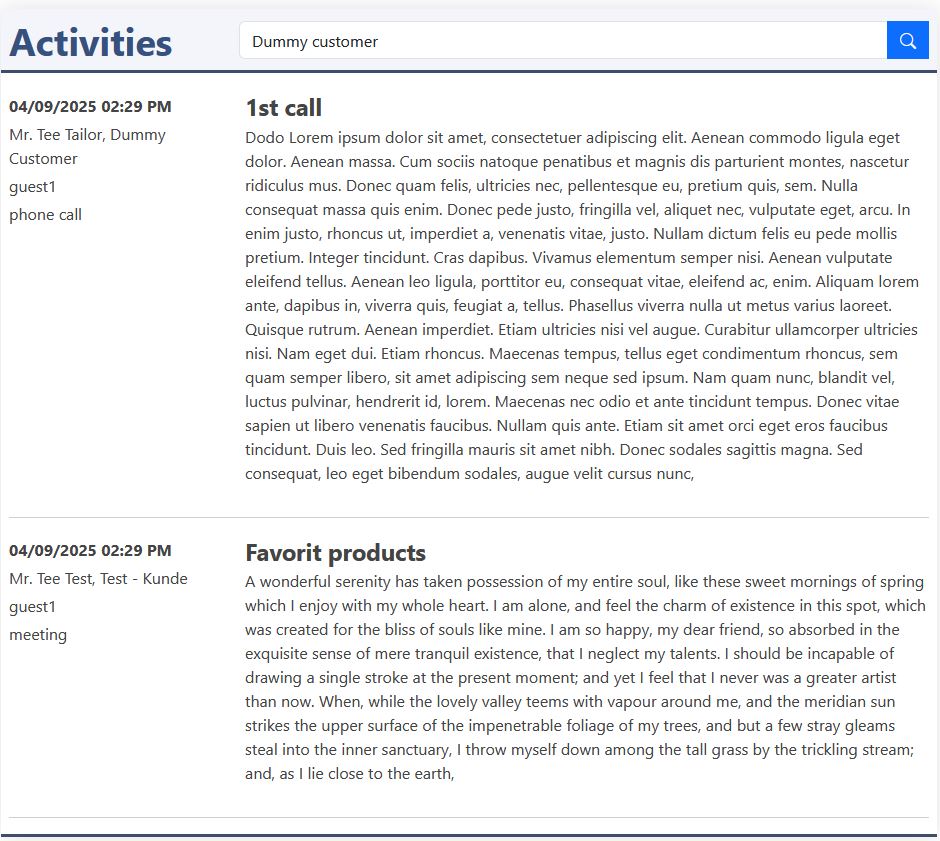
Here you see the log. The customer can be entered in the top. In the left small column the date is displayed in descending order. In the right column the subject and description is displayed.
Prerequisites
Existing prerequisites for your test:
- Customers with employees:
- datadefinition: excustomer
- datadefinition: exemployees
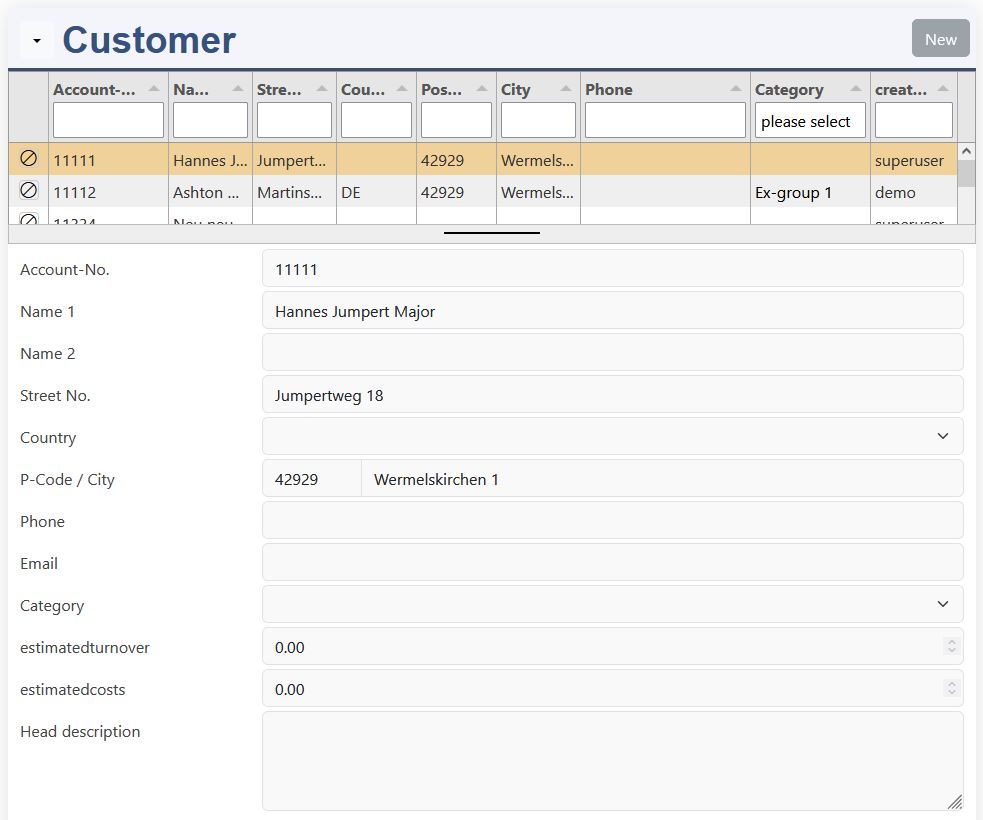
- Example master data form: masterdata excustomer
- Attention: choose your developement environement:
- internal name: exactivity_group
- definition: Group definition
- form: User groups
Instructions for Elements online
New datadefinition
Create a new datadefinition:
- datadefID: choose a new datadefID (exactivities)
- name: the displayed name
- table: choose a new table name (exactivities)
- head titel column: subject
- catalog template: catalog-news
Save
Attention, it's not saved by a red box at the window bottom line! Only by the green "saved" message, you can continue.
Please have a look to the documentation of elements online.
You need to be registerted and logged in. Open "elements online" in your environement "Admin / elements online".
Table structure
Copy the columns
Copy the columns here; goto elements online; delete the default columns; click in the tabulator columns; paste with ctrl-v this columns into the table.
Save table
Save your table. It will be created in your database.
Create datadefID
K8 Web Kit generates the datadefinition with the structure of the table, the tabulator list and the form elements.
Assistant
The assistant helps to adopte the corresponding form in a dialog.
Form elements with the Assistant
| Field / Column | Dialog | Property | Value |
|---|---|---|---|
| subject | Attributes | required | true |
| employeeID | Main | Type | hidden |
| Tabulator | ,"visible":false | ||
| employeename | Main | Field type | 212: datalist ... |
| Datalist special | datadefID | exemployee | |
| IDfield | employeeID | ||
| onlyoptions | false | ||
| data-fieldlist | accountID,accountname=customername,phone,email | ||
| accountID | Main | Type | hidden |
| Tabulator | ,"visible":false | ||
| accountname | Main | Field type | 224: inpugroup .. |
| Inputgroup (filled automatically) | Column | DROPDOWN accountname |
|
| Datalist special | datadefID | excustomer | |
| IDfield | accountID | ||
| onlyoptions | false | ||
| data-fieldlist | phone,email | ||
| Main | Type | ||
| description | Main | Field type | 152: tinymce large |
| Tabulator | ,"visible":false | ||
| activitytypeID | Main | Field type | 141: usergroup |
| Main | User group | exactivity_group (Activities) | |
| status | Main | Field type | 301: checkbox k8form+tabulator |
| Main | Sort | 20 | |
| Main | Save | ||
| Menu | Sort | click |
The Assistant can be started in elements online, Folder menu, or from the elements online menu: Form Assistant.
Enter your datadefID and Save it. Then press the button Get datadefID. Your table columns are listed in the Form elements (docu).
This 3 fields are joined to foreign tables:
- employee: this datalist looks in the employee table. If an employee is selected, the following fields are filled:
- employeeID
- accountID
- accountname
- phone
- account / customer: this datalist looks in the customer table. It also allows with the dropdown to open the customer master data form. If an customer is selected, the following fields are filled:
- phone
- activity type: this selct gets the data from the group definition. It shows the colors in tabulator and form.
This 2 fields enhance the functionality:
- description: an editor is added, which allows to make notes and links in a well formated presentation.
- status: with the checkbox the formatting is adopted in form and list.
Tabulator
please improve the tabulator list by changing:
- width
Change the label according to your needs.
Update + Open
The datadefinition is updated and the masterdata form is opened.
Activity log
<datadefinition>_catalog_record.html
You have to do only a few changes:
- column width
- col-sm-4
- col-sm-8
- 1st column
- fields from reordset
- activitydate
- contactnote
- username
- activitytypeIDtext
- JavaScript class
- fields from reordset
- 2nd columns, fields
- subject
- description
Save
Bootstrap has the layout classes:
- row
- col-xx-1 to col-xx-12
Make the left block smaller and the right block larger. The sum of both blocks should be 12.
The placeholders for the table columns are:
- {{<column name>}}
More details:
Datadefinition for master data form
adapte the datadefinition <datadefinition>.json in order of the structure:
- head[]:
- tinymce: the editor is automatically added by the assistant
- <link rel="stylesheet" href="{{root}}masterdata/css/tabulator_coloredgroup.css>
- masterdata
- sql_orderby: "activitydate desc"
In Elements online, in the Folder section, the datadefinition can be edited.
head[]
The head array allows to add JavaScript libraries and style sheets to the web site. Tinymce is already added by the assistant. The CSS style sheet adds an opacity by hovering the rows.
masterdata.sql_orderby
With the sql_orderby the order of the data set is the the column activitydate in descending order.
JavaScript
add this to your JavaScript file:
Please use this JavaScript. Replace settingsactivities with your datadefID settings<datadefID> and paste it into the JavaScript file of your data definition.
The following parts of JavaScript are already in the file:
- masterdata
- customer: the drop down of edit / new opens a new tab.
- description: the editor tinymce is bound to the form element.
- activitytypeID: the colored group support is added.
This needs to be added:
- masterdata
- the default values are set: activitydate, status
- catalog
- for the status element with the class js_status the innerHTML is set to planed/done.
Menu
| Field / Column | Value |
|---|---|
| Title | Ex CRM |
| Condition | userID>0 |
Please open Admin / Menu and create a new menu entry: New
Fill out (like described):
- Title
- condition
| Field / Column | Value |
|---|---|
| Title | Basics |
| href | {{root}}index.php?page=usergroups |
choose: Ex CRM, click
Fill out (like described):
- Title: the displayed menu entry
- href: this is the url which is executed
| Field / Column | Value |
|---|---|
| Title | Customer master data |
| href | {{root}}index.php?page=masterdata&datadefID=excustomer |
choose: Ex CRM, click
Fill out (like described):
- Title: the displayed menu entry
- href: this is the url which is executed
| Field / Column | Value |
|---|---|
| Title | Customer catalog |
| href | {{root}}index.php?page=catalog&datadefID=excustomer |
choose: Ex CRM, click
Fill out (like described):
- Title: the displayed menu entry
- href: this is the url which is executed
| Field / Column | Value |
|---|---|
| Title | Activities |
| href | {{root}}index.php?page=masterdata&datadefID=exactivities |
choose: Ex CRM, click
Fill out (like described):
- Title: the displayed menu entry
- href: this is the url which is executed
| Field / Column | Value |
|---|---|
| Title | Activity journal |
| href | {{root}}index.php?page=catalog&datadefID=exactivities |
choose: Ex CRM, click
Fill out (like described):
- Title: the displayed menu entry
- href: this is the url which is executed
| Field / Column | Value |
|---|---|
| Title | Forecast |
| href | {{root}}index.php?page=chartjs&datadefID=excustomer |
choose: Ex CRM, click
Fill out (like described):
- Title: the displayed menu entry
- href: this is the url which is executed